前段时间有人提出,希望工具箱可以加入暗色皮肤。在热心网友的帮助下实现了一份,但问题是把原来的主题覆盖掉了……为了不让热心网友的心血浪费,花了一下午时间突击学习了Angular换肤的实现。
其实从本质上来说,换肤不过是动态切换一下页面所引用的CSS文件而已,这并不难。但在工具箱的实现里,这很麻烦,因为使用了基于MDC-Webcomponent的Blox Material组件库,这套组件库使用SCSS,在编译期根据预先设置好的变量,动态生成各种中间色等等。详细来说,这套组件库的原理是:
- 自定义$mdc-theme(-primary, -secondary, -surface, -background, -on-primary, -on-secondary, -on-surface)等等颜色变量;
- 在根styles.scss中先引入上述自定义变量,再引入MDC库;
- MDC库会使用Mixins在编译时使用上述变量(如果没有的话就用缺省变量),生成很多中间色(比如$mdc-theme-text-primary-on-background等);
- 编译成为一个主题文件styles.{HASH}.css,自动插入到页面头部。
由于这种生成方式原理上无法支持“运行时使用JS修改SCSS变量”,所以剩下的只有一种办法:生成两套主题,运行时切换CSS文件。
查了很久之后终于在这里找到了可用的方法。但实际上还是需要对这篇文章里的内容做一些调整。
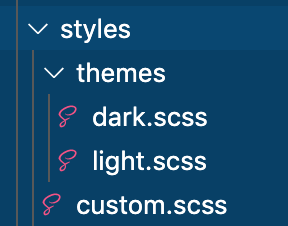
- 创建
dark.scss&light.scss:
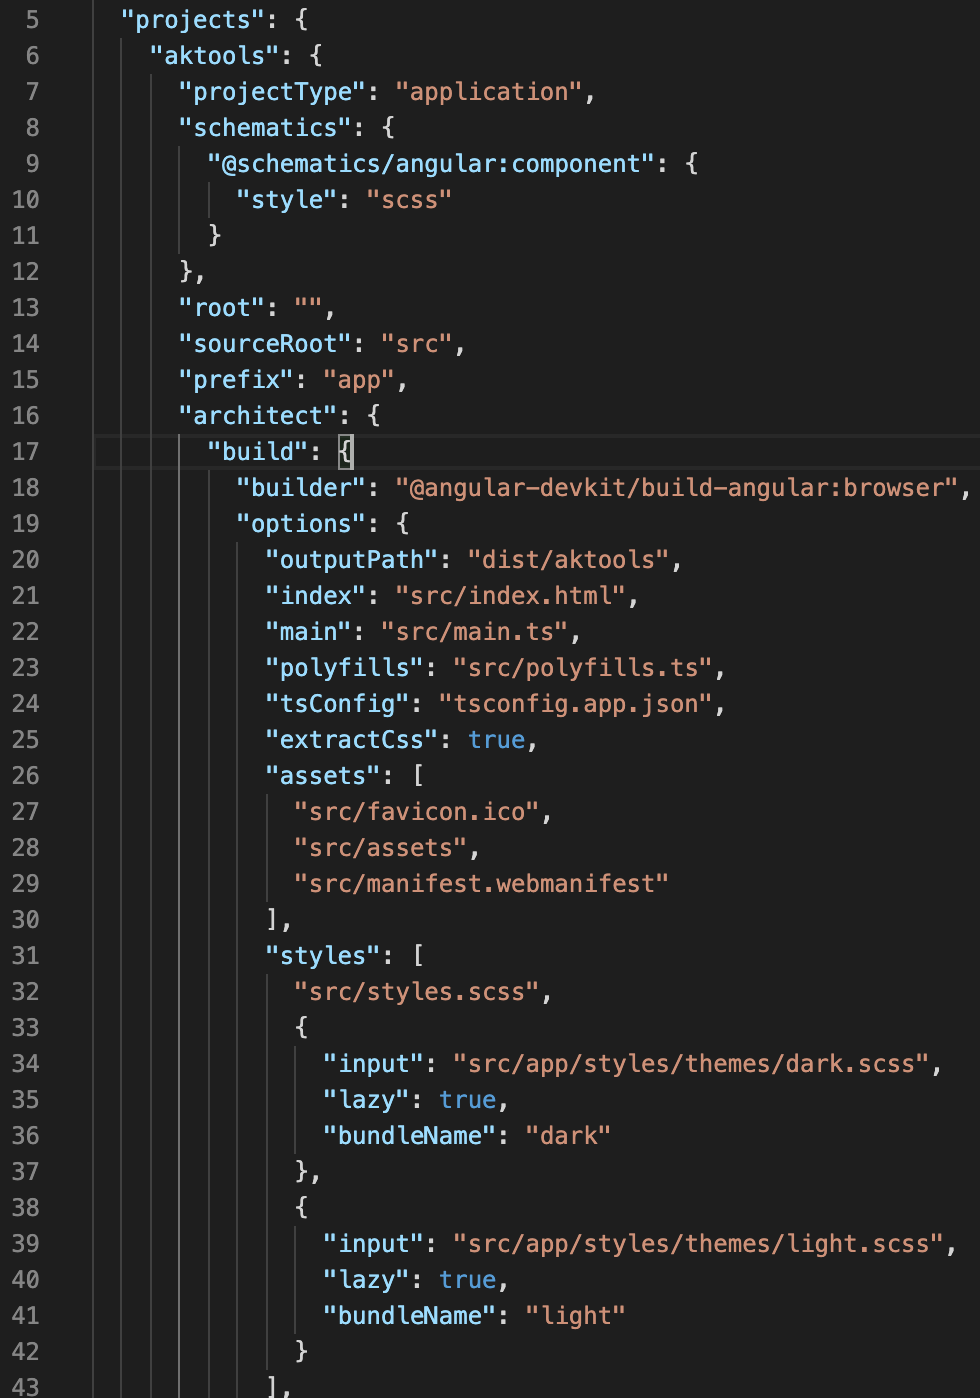
- 在根目录的
angular.json中,projects/{project-name}/architect/build/options中需要添加两项:"extractCss" : "true",以及"styles"下指定每个CSS文件的输出名和Lazy。extractCss是为了在DEBUG时(ng serve -o)就生成单独的css文件(否则会提示找不到),而styles中的每一项代表一个主题的输出文件,lazy则表示是否直接插入到index.html的开头中去,true则不会自动加入(我们要在后面手动加入):
创建一个Service来切换主题(ng generate service switch-theme)。这里我对原文中的代码做了小幅修改,这样将来如果有多套主题,切换更方便。
import { Injectable, RendererFactory2, Renderer2, Inject } from '@angular/core';
import { Observable, BehaviorSubject, combineLatest } from 'rxjs';
import { DOCUMENT } from '@angular/common';

@Injectable({
  providedIn: 'root'
})

// Copied and modified from https://medium.com/better-programming/angular-multiple-themes-without-killing-bundle-size-with-material-or-not-5a80849b6b34

export class SwitchThemeService {
  private _theme: BehaviorSubject<string> = new BehaviorSubject("light");

  private _renderer: Renderer2;
  private head: HTMLElement;
  private themeLinks: HTMLElement[] = [];

  theme$: Observable<string>;

  constructor(
 rendererFactory: RendererFactory2,
 @Inject(DOCUMENT) document: Document
  ) {
 this.head = document.head;
 this._renderer = rendererFactory.createRenderer(null, null);
 this.theme$ = this._theme;
 this.theme$.subscribe(async (target) => {
   const cssFilename = target + ".css";
   await this.loadCss(cssFilename);
   if (this.themeLinks.length == 2)
     this._renderer.removeChild(this.head, this.themeLinks.shift());
 })
  }

  setTheme(name: string) {
 this._theme.next(name);
  }

  private async loadCss(filename: string) {
 return new Promise(resolve => {
   const linkEl: HTMLElement = this._renderer.createElement('link');
   this._renderer.setAttribute(linkEl, 'rel', 'stylesheet');
   this._renderer.setAttribute(linkEl, 'type', 'text/css');
   this._renderer.setAttribute(linkEl, 'href', filename);
   this._renderer.setProperty(linkEl, 'onload', resolve);
   this._renderer.appendChild(this.head, linkEl);
   this.themeLinks = [...this.themeLinks, linkEl];
 })
  }
}
使用起来也很简单,只要引入Service,然后调用setTheme("{theme-name}")即可,比如:
export class AppComponent {
  constructor(private switchTheme: SwitchThemeService,
              private fetchService: FetchService) {
    ...
    // FetchService是内部使用的获取数据的Service,下面这行的意思是获取localStorage中名为'theme'的项,若没有则返回'dark'
    this.theme = this.fetchService.getLocalStorage('theme','dark');
    switchTheme.setTheme(this.theme);
  }
}- 在页面内添加对应的按钮和函数实现,这样即可实现主题的动态切换了。如果使用了localStorage作为存储,别忘了更改主题后及时保存。
1 条评论